Arbeit

NextJS Environment Variables in Containers

Are you working with Containers, that you build once and then push through the various stages?

If so, then this might be for you as you probably also need some if not all of your env variables available on the client side as well. Honestly I was expecting this to be the case when using NEXT_PUBLIC_* as a prefix for them…

What NextJS offers out of the box

Configuration is most of the time added at build time for next, this changed over time as originally all of them where available through the publicRuntimeConfig and serverRuntimeConfig. Having things at build time is sadly not really an option when deploying through containers as it is not reasonable to build every time the container starts…

For one of my applications that means that with all the build logic I have around 1.2Gb for the container, whereas when using the standalone output option the container size goes down to 82Mb!!!

What was and is now deprecated?

The old way for environment variables, the runtime config, was deprecated with the arrival of the app dir.

  • This feature is deprecated. We recommend using environment variables instead, which also can support reading runtime values.
  • You can run code on server startup using the register function.
  • This feature does not work with Automatic Static Optimization, Output File Tracing, or React Server Components.
https://nextjs.org/docs/pages/api-reference/next-config-js/runtime-configuration

How the runtime config was defined in next.config.js:

/** @type {import('next').NextConfig} */
const config = {
  publicRuntimeConfig: {
    variableForClientSide: process.env.ANYTHING,
  },
  serverRuntimeConfig: {
    variableForServerSide: process.env.ANYTHING_SECRET,
  }
}

This has been working most of the time, but also had it’s quirks, especially since some parts of the runtimeConfig would be inlined by NextJS – this would happen every time when a page is rendered and then outputted.

This caching might seem useful in some cases, but makes it really tricky to reliable get a good output. (ISR was partially helpful, but needed all paths to be accessed before any clients would be allowed to access it as it would otherwise output stale runtime variables from the build time!!)

To have this working it was required to have a getInitialProps either on every page or the _app.tsx to force rendering on build time.

Using process.env

Next.js comes with built-in support for environment variables, which allows you to do the following:

  • Use .env.local to load environment variables
  • Bundle environment variables for the browser by prefixing with NEXT_PUBLIC_
https://nextjs.org/docs/pages/building-your-application/configuring/environment-variables

This sounds perfect at the beginning, but starts to fall apart the moment you want to deploy in any kind of containerised system. Within your application you can reference any environment variable as process.env.VARIABLE, with the note that this implies a build time replacement of the variable (except for SSR, there it might be read at runtime…).

Default Environment Variables

This is the default behaviour that I would not expect, as this will replace the variables at build time by replacing any occurrence of process.env.NEXT_PUBLIC_VAR with the actual value.

On the server side, the variables are not inlined and can still be referenced – and therefor be used especially in the app router!

Dynamic Environment Variables

If variables should not be replaced and always be loaded from the corresponding env variable then they must be defined so it seems like the name could change.

// This will NOT be inlined, because it uses a variable
const varName = 'NEXT_PUBLIC_ANALYTICS_ID'
setupAnalyticsService(process.env[varName])

// This will NOT be inlined, because it uses a variable
const env = process.env
setupAnalyticsService(env.NEXT_PUBLIC_ANALYTICS_ID)

Nevertheless this will not behave as expected on the client side as process.env will always be an empty object. (it works fine on the server side!!). DANGER!!

Make process.env work in a containerised setup

First of, what exactly do I mean by this:

  • process.env.NEXT_PUBLIC_* should reflect on client side whatever was set at container start
  • process.env.* should reflect on the server side whatever was set at container start
  • no build should be required to have capability 1 and 2!

There are many tickets in the NextJS bugtracker, but so far I have not found any that provided a solution for this. But fear not, I have found a way! (here are some of them all related to env handling, had problems with all of them at some point, some have been fixed, some need the steps that will be outlined at the end!)

Code

// file: env.provider.tsx
import { EnvProviderClient } from './env.provider.client'
import { FC } from 'react'

export const EnvProvider: FC = () => {
  const env = {}

  Object.keys(process.env).forEach(key => {
    if (key.startsWith('NEXT_PUBLIC_')) {
      env[key] = process.env[key]
    }
  })

  return <EnvProviderClient env={env} />
}
// file: env.provider.client.tsx
'use client'

import { FC, useMemo } from 'react'

interface Props {
  env: any
}

export const EnvProviderClient: FC<Props> = ({ env }) => {
  useMemo(() => {
    if (typeof window !== 'undefined') {
      global.env = env

      window.dispatchEvent(new Event('global.env'))
    }
  }, [])

  return null
}

With those 2 files we can fix the default behaviour and expose all public env variables to the client! In case you need to update configuration if env is not yet set, use an event listener!

To then enable the client side env variables you just have to add <EnvProvider /> and they will all be available.

Problem solved!! This also works with standalone builds using tracing (https://nextjs.org/docs/app/api-reference/next-config-js/output) – this will also reduce your image size dramatically!!

Allgemein

Terraform on AWS

To get a few questions out of the way:

What is Terraform?

Terraform is an open-source infrastructure as code software tool created by HashiCorp. Users define and provision data center infrastructure using a declarative configuration language known as HashiCorp Configuration Language, or optionally JSON. Terraform manages external resources with “providers”.

Wikipedia – https://en.wikipedia.org/wiki/Terraform_(software)

So why?

It is great to have all your infrastructure configured with some kind of code. I’ve worked with AWS SAM and Cloudformation but was never happy as this would only allow me to define AWS Infrastructure.

By using terraform I can also deploy to other platforms like GCM or Azure.

Central state – why that?

This boils down to 2 options:

  1. if you are the only dev working on it, use the local state of terraform. But keep in mind that you cannot have others update the structure then as terraform needs to know the current state of the system and the import of existing infrastructure is a manual process. (that would need to be repeated every time someone else updates the structure)
  2. with a central state you can have multiple people updating your infrastructure. by defining IAM roles for AWS you can also restrict them on what can be updated. Terraform will always load the latest state before computing a change set to execute.

We will store the central state in S3 and provide locking with DynamoDB. Locking is required as we could in other cases start updates in parallel, causing inconsistent State.

If you want to read more on Terraform State handling take a look at Yevgeniy Brikman‘s article on Medium: https://blog.gruntwork.io/how-to-manage-terraform-state-28f5697e68fa

Step 1 – required tools

AWS CLI

follow the instructions on https://docs.aws.amazon.com/cli/latest/userguide/install-cliv2.html

Once finished the output of aws --version should be something like

aws-cli/1.16.309
Python/3.7.3 Darwin/19.2.0 botocore/1.13.45

Use the environment variables to configure access to AWS. If you are using profiles then call export AWS_PROFILE=profilename to use it.

Terraform CLI

follow the instructions on https://learn.hashicorp.com/terraform/getting-started/install

Once finished the output of terraform --version should be something like Terraform v0.12.23

Step 2 – IAM Policy for the State

Create a new IAM Policy called terraform-execution to give users access to deploy changes. They will need to have the permission for Terraform as well as for the resources they are supposed to create!

Do not create the S3 Bucket / Dynamo DB

table manually!

use the variables MY_*

MY_S3_STATE_BUCKET -> choose an available one

MY_AWS_ACCOUNT_ID -> replace with yours

MY_DYNAMO_TABLE_NAME -> locking table name

{
  "Version": "2012-10-17",
  "Statement": [
    {
      "Sid": "VisualEditor0",
      "Effect": "Allow",
      "Action": [
        "dynamodb:UpdateTimeToLive",
        "dynamodb:PutItem",
        "dynamodb:DeleteItem",
        "s3:ListBucket",
        "dynamodb:Query",
        "dynamodb:UpdateItem",
        "dynamodb:DeleteTable",
        "dynamodb:CreateTable",
        "s3:PutObject",
        "s3:GetObject",
        "dynamodb:DescribeTable",
        "dynamodb:GetItem",
        "s3:GetObjectVersion",
        "dynamodb:UpdateTable"
      ],
      "Resource": [
        "arn:aws:s3:::MY_S3_STATE_BUCKET",
        "arn:aws:s3:::MY_S3_STATE_BUCKET/*",
        "arn:aws:dynamodb:us-east-1:MY_AWS_ACCOUNT_ID:table/MY_DYNAMO_TABLE_NAME",
        "arn:aws:dynamodb:us-east-1:MY_AWS_ACCOUNT_ID:table:table/MY_DYNAMO_TABLE_NAME"
      ]
    },
    {
      "Sid": "VisualEditor1",
      "Effect": "Allow",
      "Action": [
        "dynamodb:ListTables",
        "s3:HeadBucket"
      ],
      "Resource": "*"
    }
  ]
}

Step 3

Create a file main.tf with the following content:

provider "aws" {
  version = "~> 2"
  region = "us-east-1"
}

resource "aws_s3_bucket" "terraform_state" {
  bucket = "MY_S3_STATE_BUCKET"
  acl    = "private"

  # Enable versioning so we can see the full revision history of our state files
  versioning {
    enabled = true
  }

  # Enable server-side encryption by default
  server_side_encryption_configuration {
    rule {
      apply_server_side_encryption_by_default {
        sse_algorithm = "AES256"
      }
    }
  }

  tags = {
    Terraform = "true"
  }
}

resource "aws_dynamodb_table" "terraform_locks" {
  name         = "MY_DYNAMO_TABLE_NAME"
  billing_mode = "PAY_PER_REQUEST"
  hash_key     = "LockID"
  attribute {
    name = "LockID"
    type = "S"
  }

  tags = {
    Terraform = "true"
  }
}

now to install all dependencies for terraform like aws execute terraform init

now to create the S3 bucket and DynamoDB table plan the changes by: terraform plan

and then execute them by terraform apply

It is always a good idea to first call plan, as this will give you an overview of the changes terraform is about to execute. With apply the changes are beeing executed (the delta to the current state could have changed if there are multiple people working on it or you changed something in the account itself!)

cautious dev

Step 4 – enable Central State

At then end of the main.tf file add now the following lines:

terraform {
  backend "s3" {
    bucket         = "MY_S3_STATE_BUCKET"
    key            = "global/s3/terraform.tfstate"
    region         = "us-east-1"
    dynamodb_table = "MY_DYNAMO_TABLE_NAME"
    encrypt        = true
  }
}

with this again call first “plan” and then terraform apply.

Also your current / local state will then be transferred to the central state!

Step 5

now commit your main.tf file to source control and start collaborating with other devs on your infrastructure!

This also makes it a lot easier to reuse infrastructure across projects!

Allgemein

Heroku – PHP Worker (Symfony3)

Many are using heroku, and I guess with a similar config to our initial one:

web: vendor/bin/heroku-php-nginx -C nginx_app.conf web/
worker: bin/console queue:worker

This seems right but something was missing

  • custom ini was not applied
  • the worker could crash and would not respawn at all (this was bad!)

to get our ini to work we passed it directly to the php command, next was to have a simple bash loop to always have a worker running.

worker: while true; do php --php-ini web/.user.ini bin/console queue:worker; sleep 1; done

There must be a better way

It’s almost painful to look at that worker configuration… There must be a way to respawn. Sadly I did not find any Bundles / finished solutions.

Note: I did not add the php –php-ini web/.user.ini  to all examples (but it should be there!)

The Idea

A command should behave kind of like a ThreadPool and restart it’s children once they quit. And in the end I want to call it like this:

worker: bin/console thread:pool --threads=4 queue:worker

The Solution

to make our process handling easier use symfony/process. Next just create a new Console command to handle several processes and keep track of them.

composer require symfony/process

And a very basic Pool:

$threads = 4;
$command = 'bin/console something';

while (true) {
  for ($i = 0; $i < $threads; $i ++) {
    if ($pool[$i] instanceof \Symfony\Component\Process\Process 
        && ($pool[$i]->isRunning() || !$pool[$i]->isStarted())
    ) {
      continue;
    }

    // here we start the process
    $pool[$i] = new \Symfony\Component\Process\Process($command);
    $pool[$i]->start();
  }

  usleep(500000); // this is important, you want to sleep some time
}

This makes it possible to have a single command trigger the amount of workers we need.

You can see the complete command here: gist.github.com/wodka/23475d36cf13e956b8db7578bf6251ed

Screen Shot 2017-04-14 at 17.38.50

Logging

this is something I missed initially. Heroku collects logs that are written to stdout – therefore we have to get the output of the processes written to our main process.

Thankfully the Process::start takes a callable with 2 arguments, $type and $buffer.


Allgemein, Arbeit

Unit tests for SF2 with IntelliJ / PHPStorm and Vagrant

you require a working Symfony instance running through Vagrant.

Prerequisites

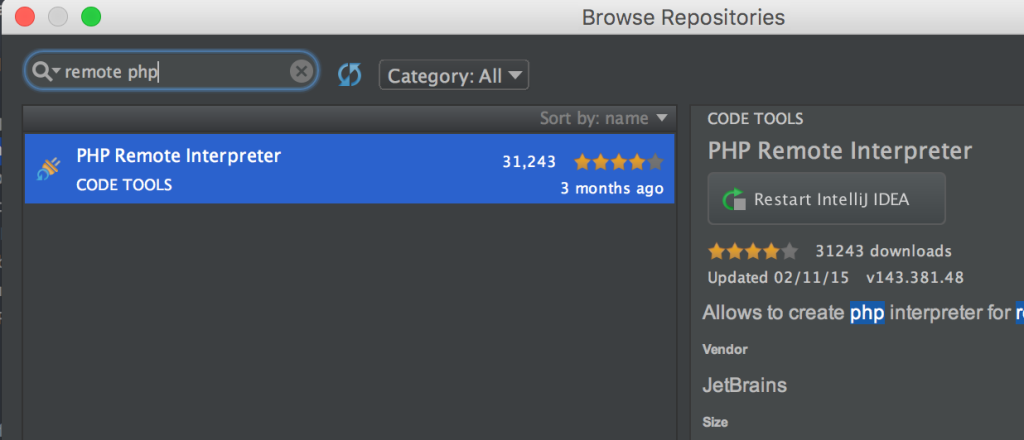
1) Install Remote Interpreter

remote_php

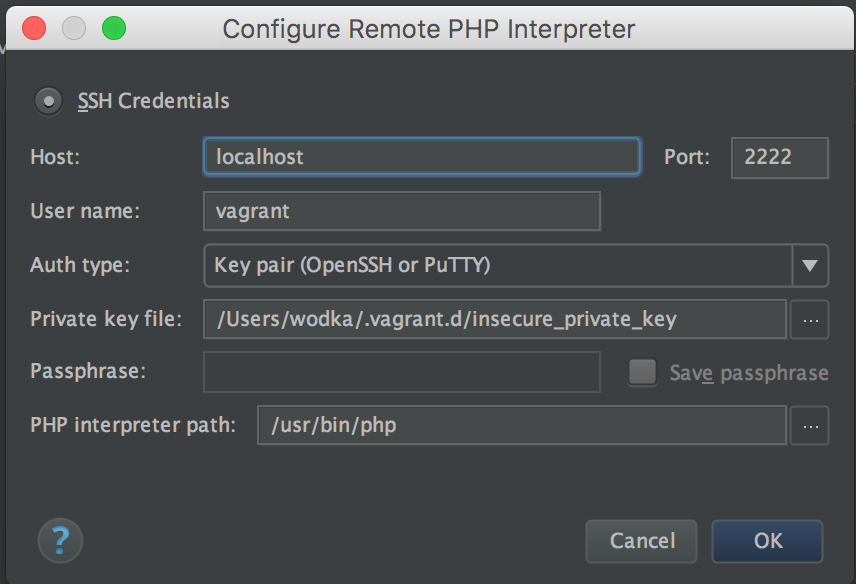
2) Add a Remote PHP Interpreter.

use vagrant ssh-config to get required information

Screen Shot 2016-02-17 at 14.11.57

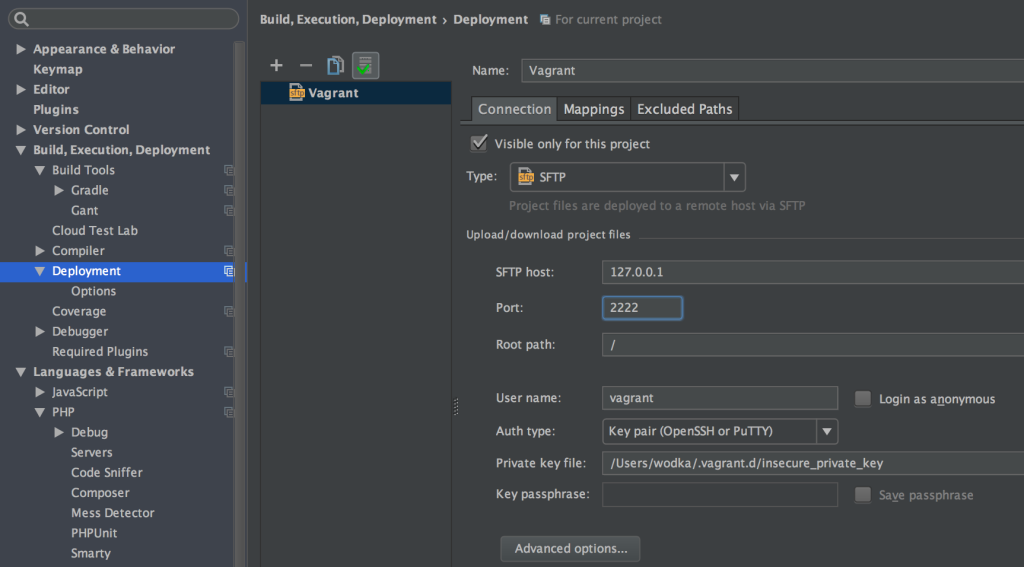
3) Setup Path Mapping (Deployment Server)

Screen Shot 2016-02-17 at 14.47.11


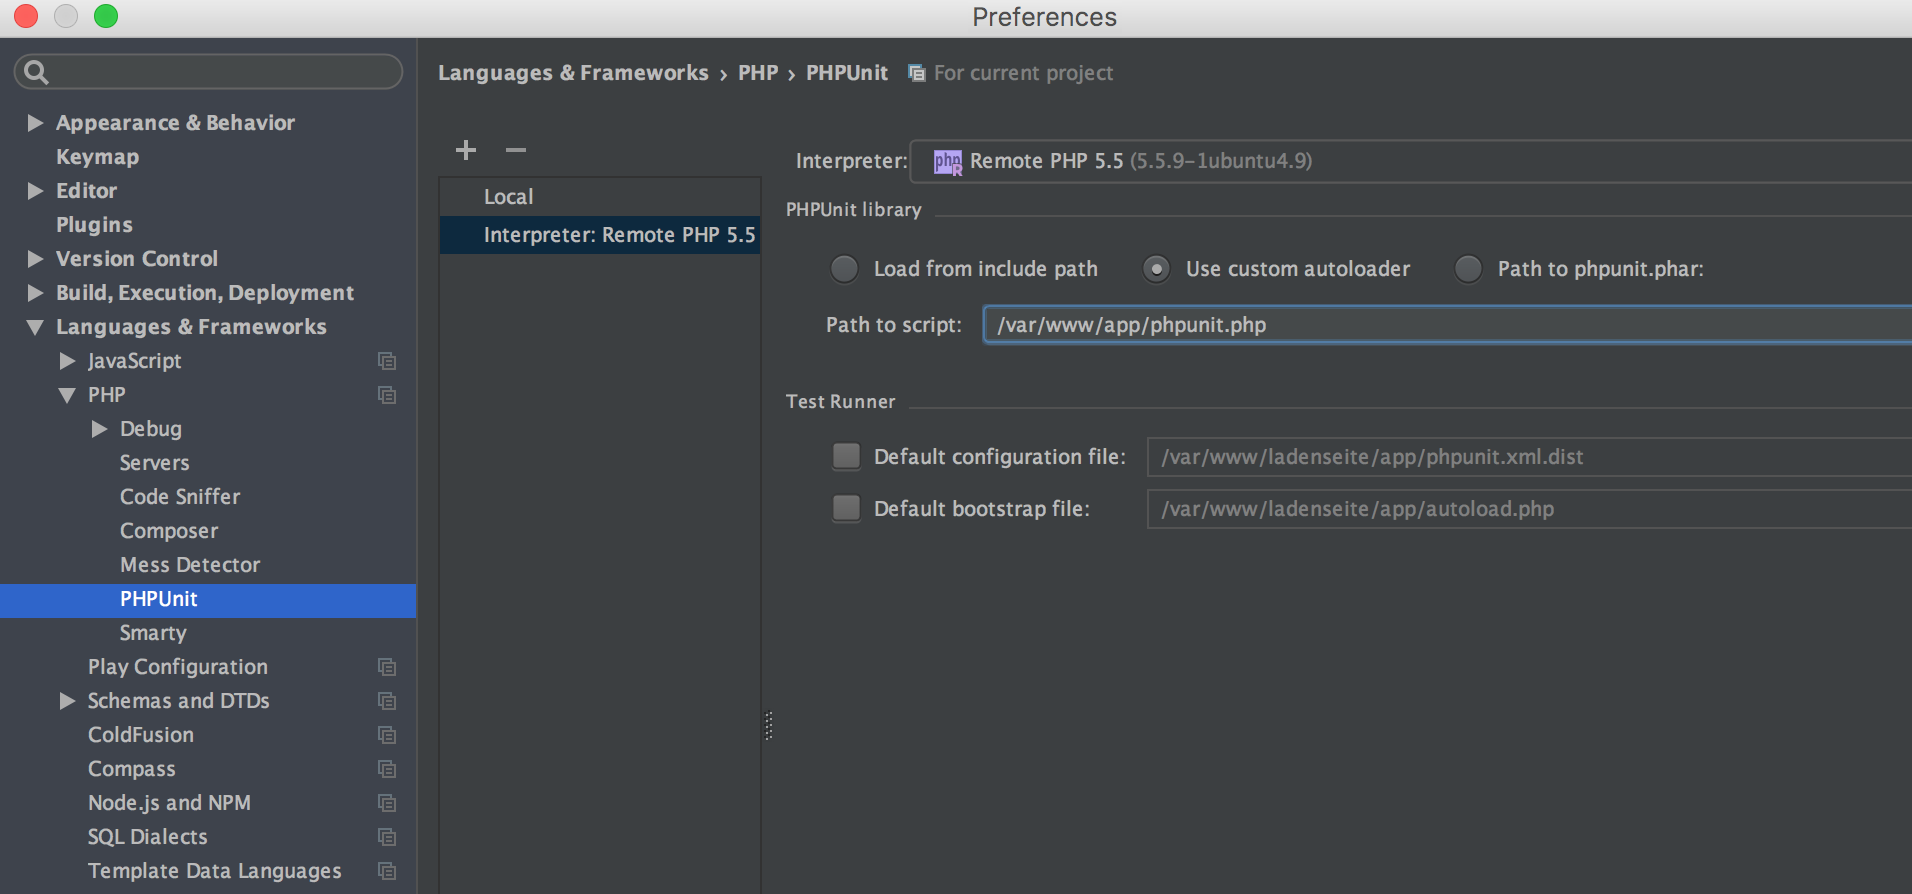
4) Setup PHPUnit

Screen Shot 2016-02-18 at 00.04.27.png

create a file in app/phpunit.php and use it as a custom loader for phpunit:

<?php

if (!defined('PHPUNIT_COMPOSER_INSTALL')) {
    define('PHPUNIT_COMPOSER_INSTALL', __DIR__ . '/autoload.php');
}

require_once 'autoload.php';

this allows you to use @runInSeparateProcess till https://youtrack.jetbrains.com/issue/WI-29458 is fixed


Now everything should be setup and you can run the tests in Vagrant 🙂

Allgemein

Bitbucket Build Status from Codeship

Maybe you have heard about the new Build Status in Bitbucket – it’s awesome and shows you how good your commit / pull request is doing.

There is still a lot to be improved especially for pull requests compared to github but they will get there!

bitbucket

Integrate Codeship

Create a php file anywhere (must be reachable from the web) with the following content: snippet link

The script accepts the json data from codeship and pushes the build status (in progress | failed | success) to bitbucket. Also fill in your credentials from bitbucket!


that’s it 🙂 enjoy!

mobile

Fabric.io and Ionic

UPDATE 2017-02-19: use the plugin https://github.com/sarriaroman/FabricPlugin instead, crashlytics is now part of fabric

If you are looking for a great framework for crash reporting with your hybrid mobile app – look no further.


Right now there are only a few working out of the box in this constellation – crittercism is one of them but do not go there… here are a few reasons why you should not try them

  1. ui is slow
  2. if you are in europe it will be a bit buggy – at least it was for me, telling them about errors in their error reporting code base… (this is not how I expected this to work)
  3. very slow support
  4. expensive (cheap compared to new relic but still)


Now to Fabric.io (formerly known as crashlytics)

The Setup

this is tricky 😀 follow any guide you like for ionic, and then inside Android Studio install the Fabric.IO plugin. Warning – there are quite a lot of plugins for crashlytics that no longer work…

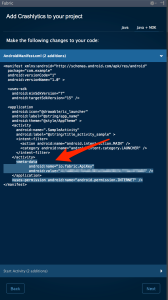
crashlytics_step_1Next step is to open the platform/android as a separate android project – this will enable you to add the fabric code to your application. There is also a .fabric-io file in the android project root – this will contain your application secret.

Next step is fairly simple:

ionic plugin add https://github.com/DrMoriarty/cordova-fabric-crashlytics-plugin –variable CRASHLYTICS_API_KEY=YOURKEY –variable CRASHLYTICS_API_SECRET=YOURSECRET


well that’s it 🙂

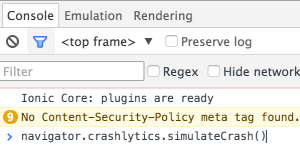
If you have not yet finished the fabric setup you’ll have to trigger an error – this is quite simple by attaching the debuger (chrome://inspect) and calling

navigator.crashlytics.simulateCrash()

Screen Shot 2016-01-18 at 23.43.04

final words

I really like crashlytics and now it’s usable for both android and ios clients! Go build your hybrid apps and add useful crash reporting

Allgemein, Arbeit

from Ubuntu to OSX

Over the years I moved from windows to linux and now to osx. Why you might ask?

Well, this is simple: I no longer have the time to configure the system to work the way I want it to. It is just supposed to do as much as possible without my intervention.

Ubuntu came pretty close to that but sadly my old vaio was breaking down.


I’m using OSX now for a month and I’m more that just happy! There are things missing like the “select and paste with middle mouse button” that I’m used from ubuntu and the option to move windows with the mouse and the keyboard, but it is close enough.